Hi Pirates,
This guide is on treasure hunt.
In treasure hunt, you set sail for 20 minutes with rewards coming back as either a hat or a cloak, depending on which one you selected.
You use favor to refresh up to 8 times, and you can refresh to a better map for more fame, berry and equipments. You can also gold refresh.
You can also attack other players, and if you win you can get some fame and berry. You can rob 4 times a day and you can rob a NPC once a day. The NPC gives a lot of fame, so do remember to rob them.
Same as production, you can exchange stars gotten for equipments.
You get to treasure hunt 5 times a day, maximum accumulation 15.
Happy Pirating!
Hi Pirates,
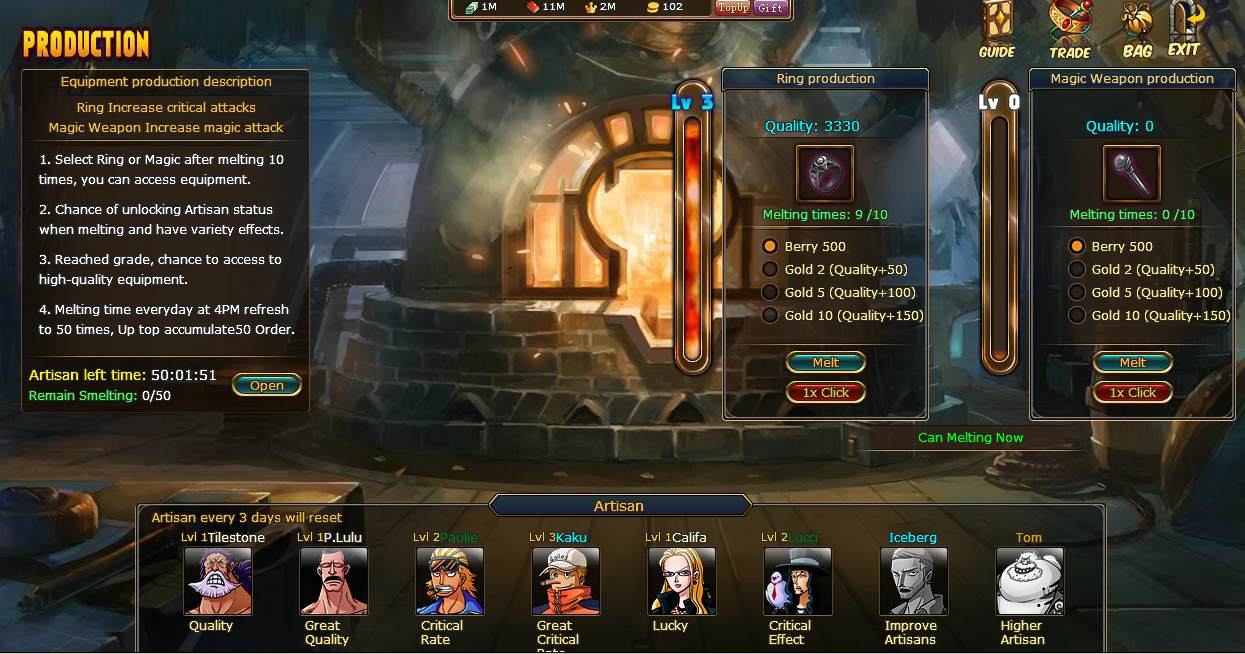
This guide is on equipment production.
At equipment production, you can produce rings and staffs using berry.
Artisans give bonuses to your production so you can achieve higher score to get better equipments, you can get 5 star fragments from level 5 to 9, 6 star fragments from level 6 to level 9. Getting a finished product gives you a 6 star equipment.
Artisans have different levels (1 to 3) and reset every 3 days.
To get artisans, you can either get by chance while smelting or when you spend gold.
Each time you produce, you can get stars and can exchange for fragments or equipments in the trade area.
Happy Pirating!
Hi Pirates,
This Guide will be talking about the Exploration function and the use of gems.
Firstly, the explore area is represented by a NPC with a Gems logo above them. Click on them and then click explore to go to the exploration page.
The gems can be viewed using the gems logo on the bottom row, and you can equip gems to equipments.
There are 8 rarities of Gems,
1 star gems - exp gems that can not be equipped. They normally give a lot of exp.
2 star gems - the basic gems that you can get from exploration.
These gems increase the base attack or defense by 20. If you feed this gem to another gem, it gives 50 exp.
3 star gems - These gems add the base by 40, and can be found on the second stage and third stage. They give 100 exp.
4 star gems - There are two types of these gems, one adds 1% per level, the other adds 60 per level. They give 150 exp, and can be found on the third and fourth stage.
5 star gems - There are also two types of these gems, one which adds 1.25% and looks like a curvilinear triangle while the other is a rectangle that adds 80. They both give 200 exp, and can be found on the fourth stage and final stage. Getting this from exploration would result in an announcement to the camp.
6 star gems - The highest quality gem you can get from exploration, and is very elusive. It can be found only in the final stage, although most of the time I would get a 1 star exp gem instead.😔 These gems are truly precious, giving 1.5% per level. They are very difficult to get.
7 star gems - I know i said the highest quality you can get from exploration is 6, but there is a way to get 7 star gems by exchanging it (which is not until a long time later). These gems give 2% per level, and are notoriously difficult to level up due to the insane amount of exp required.
8 star gems - Similar to 7 star gems, these gems have to be exchanged and give 2% per level PLUS an additional 20 base stats.
The blue coloured gem (not background) is equipped on cloth as it increases physical defense,
light blue to cloak,
yellow to hat,
green to necklace,
red to weapon,
orange to ring
and purple to staff.
The big question is:
When is the percentage gem better than the base stats gem?
The answer is pretty simple:
Remember the base stats you can view on the crew area?
Remove the gem and take a look.
If you have more than 4000, the 1% is better than the +40,
and the higher the percentage the better it is.
Comparing to the +80,
the 1.25% is better when the stat is more than 6400.
What if i made a high level 2 star gem and i want to use the 3 star gem? Fret not, the amount of exp added in increases the exp value given when the gem is fused.
Also, higher grade gems cannot be fed to lower grade gems, so no worries about giving your 6 star to a 2 star.
The maximum level of the 6 star gem is 50, and requires about 4150425exp.
7 and 8 star gems have a much higher cap.
Don't forget to explore to increase your power even more!
Happy Pirating!
Hi Pirates,
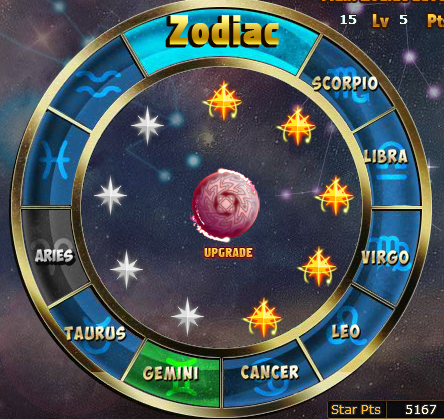
Do you believe in Horoscope?
I don't but I do believe in enhancing my zodiac in Anime Pirates!
The zodiac allows you to increase your stats using star points, obtained by purchasing star points (500 a day using 100,000 berry).
The higher the zodiac level, the more star points you will need to level it up. However, it drops every time the stars go from all lit to none lit. Also, you get free daily zodiac blessing, which is worth a lot of exp.
At level 11, you can use the horoscope sign and change your talent.
Scorpio is unlocked at level 11,
Libra at Level 11 5 points,
Virgo at Level 12,
Leo at Level 12 5 points.
Scorpio has S- magic defense, Libra critical defense, Virgo magic attack and Leo critical attack.
These zodiacs also have their own advancements which also adds to YOUR protaganist's stats.
Cancer, Taurus Aries and Gemini all require talent scrolls, and are available after level 100 and develop lvl7.
Gemini requires cancer to be unlocked + gemini talent scroll,
Taurus needs Gemini unlocked and the Taurus talent scroll,
and Aries (which is S for physical attack) needs Taurus unlocked and the Aries talent scroll.
Cancer is all A,
Gemini is as seen above,
Taurus is S- magic and physical attack,
Aries is S physical attack.
You can also do the challenge at activity to get star points.
Happy Pirating!
Hi Pirates,
Wouldn't it be nice if you had other companions besides your nakama?
Well now you can use pets!
Pets can follow you in the game, and they can increase your stats, making them really important (and cute) to use!
You can also train them at the pet room, the cool down is 2 hours.
Each pet has a different talent, so make sure you use the pet which helps you the most!
Happy Pirating!
Hi Pirates,
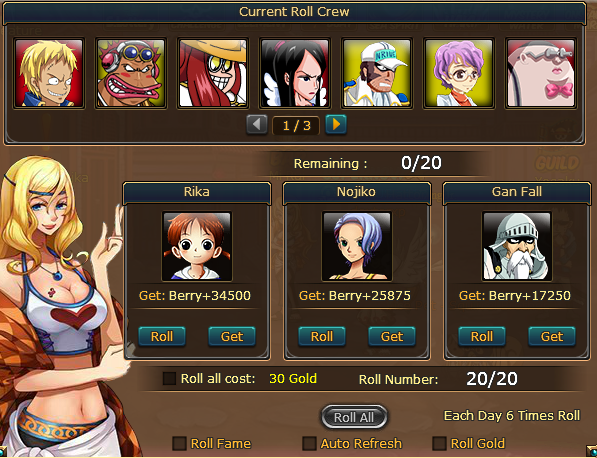
The Roll function allows you to get more gold, berries, favor and equipment every day.
You can roll 6 times a day, maximum accumulation is 20 rolls.
You can also get rare crew that cannot be gotten from fame, such as Smoker, Enel, or Lilu!
If you don't like the reward, you can spend gold to re-roll, so no worries if you keep getting 1 star necklaces😁
However, you can only get 1, 2 or 3 star necklaces here.
At certain levels, more columns will unlock so you can choose which to roll.
You can find the Roll area at the Bar, don't forget to roll every day!
Happy Pirating!
Hi Pirates,
Don't you feel lonely when you play alone?
The Guild function lets you join hands with other fellow pirates in the quest for One Piece, and you will have more friends to talk to and to battle side by side with!
Apply to a guild or create a guild and wait to be added, and once there you can donate to increase contribution and fame!
You can battle together for resource war (more berries yay) and get more stuff for devil fruit events and more!
Isn't it great to get more favor and berry by making friends?
Happy Pirating!
Hi Pirates,
This guide will be talking about the "Research" function.
In Research, you can increase stats for health attack and defense.
The limit of level of research is based on the level of your institute in your ship, and is capped at your level.
Researching costs favor, and permanently adds stats to you and your crew.
The higher the level of research, the longer the cool down and the more favor it costs (200*next level)
1 gold reduces the time of cool down by 5 minutes, so if the cool down is 5 minutes 40 seconds you should wait till 4minutes 59 seconds to speed up cool down.
Each attack research increases attack by 5points, while defense increases by 3 points and health by 15.
Happy Pirating!
Hi Pirates,
This guide will be covering Continuous Attack.
This can be found when you enter the blue sigil and click the continuous button.
You can select the number of times to attack based on how much vitality you have, and you do not need to be online. Every three minutes, it will defeat the enemy, and you can get the rewards from the battle and the exp too.
You can select which main enemy to fight, but it must be one that you have defeated before.
Happy Pirating!
This is yet another very short guide, and will be covering the Exp Icon.
You get free acceleration once every day, so use it to collect exp. Also, there is a cap on how much exp you can accumulate, so remember to collect regularly to level up.
Happy Pirating!
This Guide will be covering the Arena feature.
 Arena Logo
In Arena, you can battle other players to reach higher rank.
You can fight against five people, arranged in increasing ranking.
The two on the left is lower ranked than you, while the three on the right is higher.
Every three days, you will get the rewards based on arena ranking, getting fame berry and favor.
If you defeat a higher ranked player, you will swap ranks with them, so if you lose to a lower rank you also swap ranks with them.
Happy Pirating!
Arena Logo
In Arena, you can battle other players to reach higher rank.
You can fight against five people, arranged in increasing ranking.
The two on the left is lower ranked than you, while the three on the right is higher.
Every three days, you will get the rewards based on arena ranking, getting fame berry and favor.
If you defeat a higher ranked player, you will swap ranks with them, so if you lose to a lower rank you also swap ranks with them.
Happy Pirating!
Hi Pirates,
This guide will be covering the Harbor feature.
I skipped the main ship as it does not do much.
At the harbor area,
You can view your ship and other's ships.
Subsequently you will be able to conquer them as slaves or attack players from other camps for fame.
Depending on your camp, you will be in a different harbor, and there is an option for a neutral harbor where all players from different camps can be together.
A Screenshot of what the harbor looks like.
Happy Pirating!
If this is your first time on this blog, please start reading from the bottom.
Hi Pirates,
This guide will be explaining the "Formation" feature.
Formation affects the positions of your characters, and the order of attacking is based on the number (1 attacks first, then 2...).
Also, it affects which row the character is at, and which enemy it will be going against. You can upgrade the formation to increase the stat boost it gives, and all formations have different attributes such as Ice increasing crew's P.Def.
You can advance the formation every 5 levels, and it costs favor. After a certain level, you will be able to use more crews in the formation, to the max 5.
Happy Pirating!
If this is your first time on this blog, please start reading from the bottom.
Hi Pirates,
This guide will be covering how to enhance more efficiently, and is for when you have basic understanding of how enhancing works.
Each equipment has different enhance boost stats, so some equipments would increase more stats per enhance than others.
Most of the time, the higher the rarity and the level requirement, the the more it increases.
It is a good practice to level up equipments when the success rate is higher, as if it fails, the berry is lost. This gets especially painful with orange equipments (7 stars), as millions can be lost if it fails.
If you have lots of gold and you think that you need to enhance urgently, you can increase the success rate to 100%. 1% requires 1gold, to the maximum capped at 15 gold when success rate is 85 or less.
Otherwise, since the success rate fluctuates, you could wait till the risk is much lower before enhancing.
Often we change weaker equipments to newer higher grade equipment, and we want to know when an equipment gives us a better boost than the latter. Make sure to calculate the added stats of and compare (the orange number + green number).
The higher the grade of the equipment, the more it would cost to enhance, and the higher the enhance level the more it costs to add another level, and the maximum enhance level is capped at the protaganist's level.
Don't fear if you spent 9million on an equipment only to sacrifice it for a better equipment, because you can always give it to a weaker crew, or sell/gift it. The amount of berry spent successfully to enhance adds to the selling price, so you will get 9 million back.
Happy Pirating!
If this is your first time on this blog, please start reading from the bottom.
Hi Pirates,
This post will be a basic explanation and introduction to the "Enhance" feature.
The "Enhance" feature is represented by a hammer on a bronze anvil, and the name is abbreviated ENHC.
Over here, we can enhance our equipments to increase their stats.
How Does Enhancing Work?
Enhancing uses berry, and the chance of success is based on the percentage success rate (green bar). However, you can use gold to increase the success rate to 100%. The success rate changes once in a while.
CD means cool down, and everytime you enhance (whether successful or fail), will increase the time by 1minute.
If the CD increases to 10minutes or more, it will turn red and you cannot enhance until it goes back to zero, so be careful!
Everytime you enhance successfully, the amount of base stats added is based on the equipment's green words when you mouse over it (if it says enhance:18, it increases by 18).
Happy Pirating!
If this is your first time on this blog, please start reading from the bottom.
Hi Pirates,
After clearing the first battling quest, you should unlock the first feature, the "Crew" Feature.
This feature has the image of Luffy's straw hat, and can be found on the bottom row. It is always the left most icon on that row, and is a very important feature to know about.
What Does The "Crew" Function Do?
Clicking the Crew Function, we can see the items that are equipped on each crew member.
From here, we can equip and unequip equipments by dragging them to the correct slot or by double clicking on the logo.
On the left side(from top to bottom):
Hat (increases a bit of health and magic defense)
Cloak (increases a bit of health and critical defense)
Cloth (increases a bit of health and physical defense)
Necklace (increases a lot of health only)
And on the right side(from top to bottom):
Weapon (increases a bit of health and physical attack)
Ring (increases a bit of health and critical attack)
Staff (increases a bit of health and magical attack)
In General, all equipments give a bit of health, while the Necklace is solely used to increase the health of the user.
The left side all either reduce damage taken or increase health, and is mostly to help you survive more damage against enemies.
The right side also increases health, but also increases the damage you deal to the enemy.
The "crew" function also shows how much base attack and base defense the crew member has, and the strength, agility and intelligence, and most importantly the grade of the talent.
The higher the base attack, the more damage you deal to the opponent(but having 700 attack doesn't mean you deal 700 damage), while the higher the defense the less damage you take.
REMEMBER:
The enemies (both non-player characters or NPC and real players) have their defense too, so against a higher defense enemy you may deal less damage.
Strength affects your physical attack and defense, and the agility for critical while intelligence is for magic.
This can be increased by many ways but I will not be talking about it here.
The talent/grade, is represented by letters, following this order of superiority:
E<D<C<B<A
So A would be better than B.
There are also the plus (+) and minus (-) signs, so A+>A and A>A-
These also affect the amount of damage you deal and damage you take.
The red bar represents the crew member's total health, while the blue bar below the character represents the exp bar (in other words how much experience points required to level up).
There is two names written next to the skill and rage area, and this is a brief description of the attack the crew member would use.
Skill means the normal attack, while rage is the attack the crew uses when the fury is equal to or higher than 100.
If the attack has the sign [Physical], it means this attack deals damage based on your physical attack. Similarly, critical is based on critical and magical is based on magical.
Rage skill deals a lot more damage than a normal attack, and in most cases is the finishing attack used on an enemy.
Hope this helps you understand the crew function!
Happy Pirating,
OnePieceFan Out
This blog will serve as a simple guide for any players confused with tutorials in the game Anime Pirates : anime.playwebgame.com
I want to help you guys learn to play this game and its features, and i speak English only so this guide will be 100% English.
The format of this blog would go in the same order as the storyline features unlock, so it should be easy to find what you need! XD
I may also occasionally post walkthroughs on certain battles, or describe certain crew and whether it is useful or not.
Happy Pirating!
OnePieceFan out!